| Version 12 (modified by AlexT, 9 years ago) (diff) |
|---|
TUTORIAL: How to personalize your Dolphin Site
Once you've installed your Dolphin software, the next step is to personalize the site for your own use. This tutorial will guide you through all aspects of customizing your site for your use!
INDEX
- Branding
- Personalize your Dolphin design
- Personalize your Dolphin Layout
- Personalizing Text
- Personalize Email Templates
- Remove the Boonex Licensing
Branding
You want to make your site both individual and easily recognizable. These steps will help you brand your site using your own logo, favicon and site title.
Logo
To create your site's logo, use your own graphics program or one of the many online logo generators available. A few examples:
- http://cooltext.com/
- http://www.flamingtext.com/
- http://www.onlinelogomaker.com/free
- http://www.thepcmanwebsite.com/logo_creator.shtml
- http://www.logocraft.com/
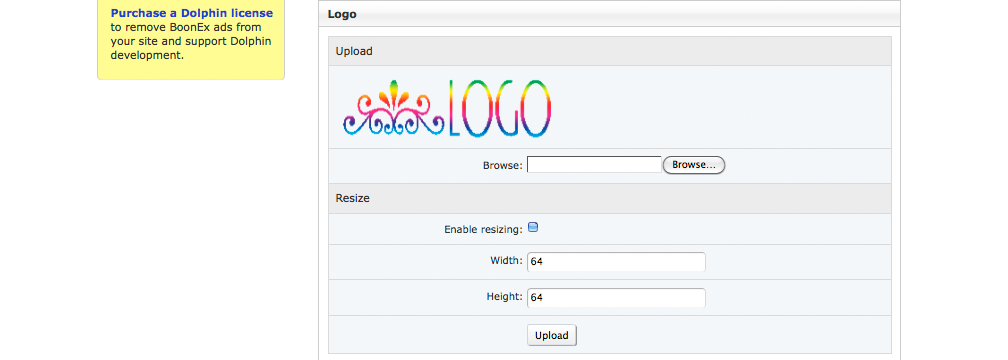
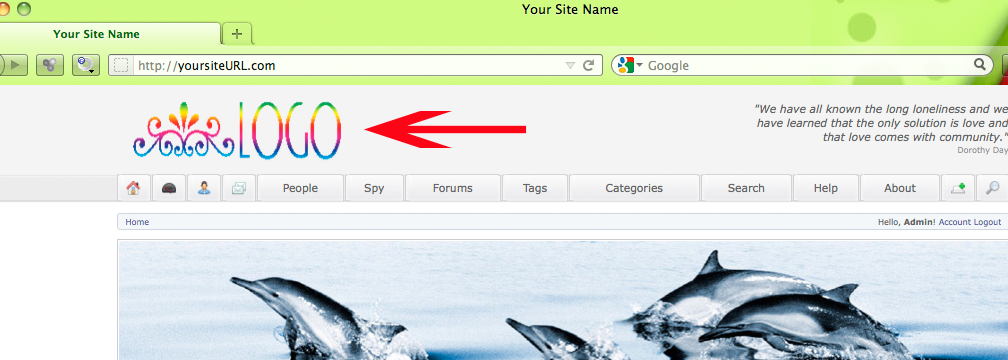
Once you have your logo created and saved to your local computer, you upload it via Admin>Settings>Basic Settings>Logo. There is an option to "Enable resizing" and settings for the width and height - deselect this option. If you want to resize your image, do it using a graphics program instead or you will slow down the loading of every page of your site.
Use the browse feature to upload your logo to the site. It will then appear in the upper left hand corner of every page of your website.
![]()
![]()
Favicon
Favicons are the small icon that appears next to the web address in the URL bar of a browser. They are typically 16px x 16px and can be static or animated. To create a favicon for your site, you can use your own graphics program (make sure it's in the proper .ice format using an online converter such as http://www.prodraw.net/favicon/index.php). Or you can use a favicon website to choose a pre-created favicon or to create your own. A few examples:
- http://www.favicon.cc/
- http://www.freefavicon.com/freefavicons/objects/index.php
- http://www.freefavicon.com/
- http://www.iconj.com/animated-favicon.html
Once you've got your favicon image chosen and set in the correct format and naming convention (i.e., favicon.ico), simply upload the image to your root folder (i.e., public_html). Don't forget to clear the cache! If your favicon doesn't show up, try the following steps:
- Wait a minute. For some reason it can take a while for the favicon to show up on all browsers.
- Clear the site's cache.
- Clear your browser's cache.
- Open the favicon file directly to make sure that the image itself is working: http://<yoursiteURL>/favicon.ico. If the icon doesn't show up when directly accessed, then the image itself is in the wrong format or is corrupt.
- Double check that the favicon.ico is in the root folder. If Dolphin is in a subdirectory or is a subdomain, it will inherit the root directory's favicon by default. You can try putting your Dolphin favicon in your Dolphin's root folder (the top level Dolphin folder).
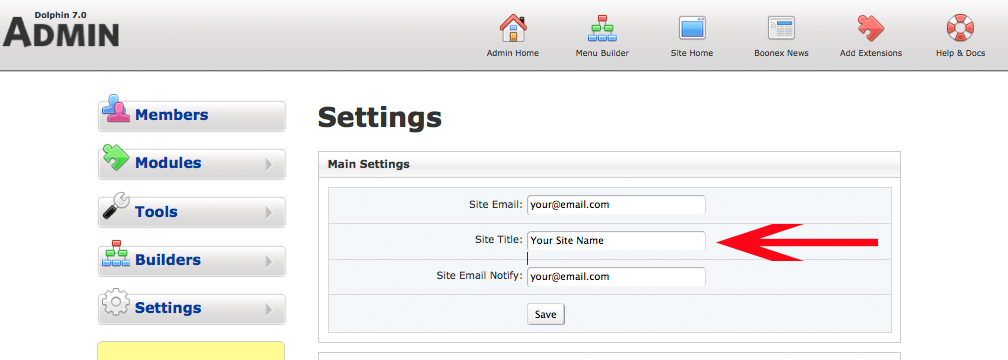
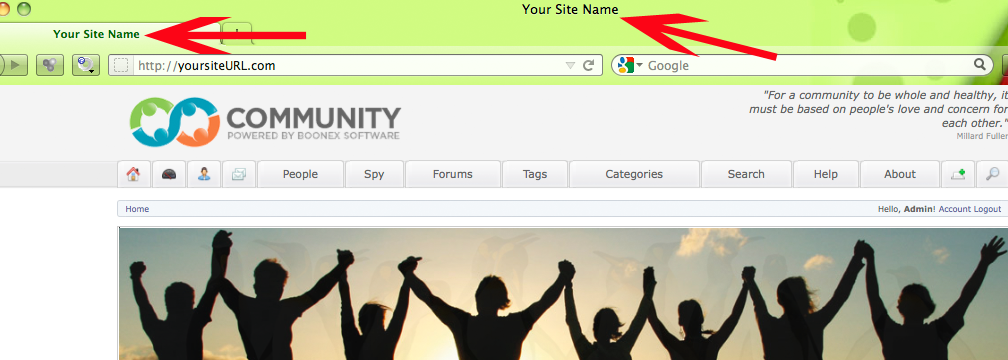
Site Title in Browser Window
Go into Admin>Settings>Basic Settings and look under "Main Settings," type in your Site Title. This is what will show at the top of your browser window.


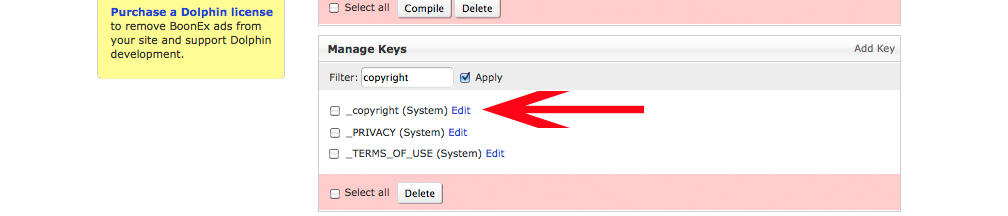
Copyright
Change your Copyright to your company name or site name using the Language Settings. Admin>Settings>Language Settings>Manage Keys, type "copyright" into the search box and click the box next to Apply. Click the Edit link next to _copyright (System).

In the popup edit box, edit it to say what you want.
- © is the code for the copyright symbol
- {0} is the code for the current year
Promo Banners
Customize your rotating Promo Banners by creating your own personalized images with the dimensions of 994px x 262px. Add and/or delete banners, or even switch to an html reloader, in Admin>Basic Settings>Promo. There are several free graphic editors available if you don't have one, here are a few examples:
Personalize your Dolphin design
Unless the default look of Dolphin's design is exactly what you want your site to look like, you're going to want to personalize your Dolphin's design in order to make your site your own. Personalizing your Dolphin's design can be as simple or as complicated as you want it to be, depending on how many elements you want to change. In order to keep your customizations intact, make sure that any design changes you make are on in your own Template files (UNI or create your own) rather than in the Base Template files. When Dolphin upgrades are released, they will upgrade the Base files and overwrite your customizations.
Here are a few ways you can personalize your site's design:
- Templates.
- To change your Template: Admin>Advanced Settings>Template
- There are free and purchasable templates available in the Boonex Market (http://www.boonex.com/market/category/templates).
- There are free and purchasable templates available at various websites, just google "Dolphin Templates"
- Make sure that any template you install is compatible with your installed version.
- I recommend making sure that the Template designer/developer offers support for their template, otherwise if something goes wrong you are on your own and there is next to no documentation or support available for Templates.
- To create your own template: http://www.boonex.com/trac/dolphin/wiki/DolDesign
- Design elements. Dolphin has many design elements that you can customize on your site, the main issue with tweaking these elements is being able to find them:
Personalize your Dolphin Layout
The default Dolphin installation can be modified to better meet your site's needs in several ways.
Navigation Menu
You can customize your Navigation Menu via Admin>Builders>Navigation Menu, where you can adjust which menu items will show in the top nave menu for which users.
- Active Items are items which are in your menu currently.
- Inactive items are items which are not in your menu currently (or repeats of ones that are in your menu currently!) but can be placed in your menu by dragging them to the Active Items area.
- Blue Items are the top level Navigation Menu listings (the ones you see on your menu)
- Green items are the secondary Navigation Menu listings (the ones you see in a dropdown menu when you hover over the main listings and that appear in the submenu when you navigate to the top level page)
- Red items are system level menu listings, they will show when navigating to certain pages but do not show on the main navigation menu.
Here you can use the grey grabber part of any one of the items to rearrange the menu items into the order you prefer.
In the Navigation Menu Builder, you can control how your Navigation Menu looks on your site:
- To control the order of menu items, grab the grey grabber bar on the side of the item and drag it to where you want it to be. You can rearrange the top level items to control the order of tabs in your main menu and the secondary levels to control the order of items in the dropdown menus.
- To control what menu items visitors and members of your site see, click on the hyperlinked name of the menu item. A popup edit box will appear where you can select/deselect visibility for Guests and Members.
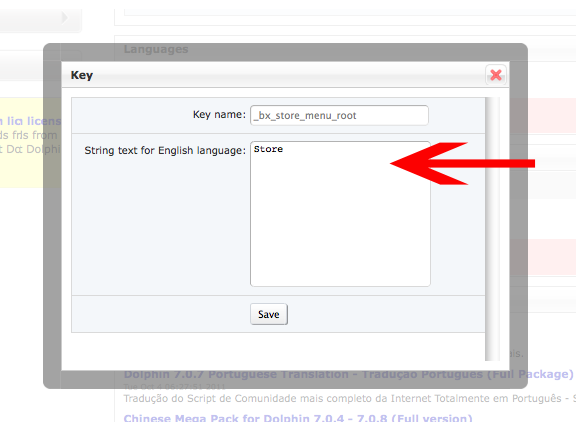
- To change the text of menu items, click on the hyperlinked name of the menu item and make note of the Language Key for that item.


Go to Admin>Settings>Language Settings>Manage Keys and enter the Language Key you found in the Nav Menu edit box above, click the box next to Apply. The language key will appear, click the edit button next to it. In that edit box, you can change the language key in the box labeled "String text for English language:" to whatever you want to appear in the Navigation Menu.

- To change from text to icons in your menu, double click on the name of the item and simply add an icon in the edit box.
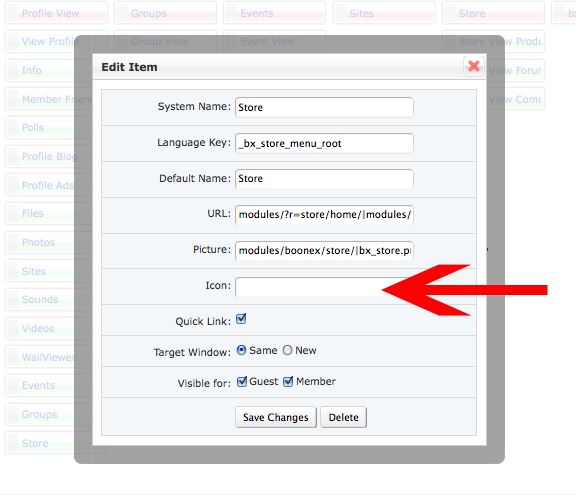 To learn more about how to format these images and where these images are stored, read "To edit and replace the top menu icons" at http://www.boonex.com/trac/dolphin/wiki/TutorialHowToWorkWithIconsAndImages.
- To change from icons to text in your menu, simply remove the icon links from the same edit box above.
You can control the number of menu items that show in your main navigation menu before defaulting into the "More Menu Items" category, which can come in handy especially if you are using icons instead of text in your menu. Play with these settings to see what looks best for your site. Admin>Settings>Advanced Settings>Other and change the settings in the following two boxes:
- The number of tabs shown in the navigation menu before the More link for logged in members.:
- The number of tabs shown in the navigation menu before the More link for visitors.:
Keep in mind that if you've edited the menu items that are visible for visitors in the above steps, you may want to also edit how many menu item tabs that show in the navigation menu for visitors as well in order to keep the look of the menu the way you want for both members and visitors.
Member Menu
To activate/deactivate the Member Menu, tick or untick the box for "Enable member menu:" in Admin>Advanced Settings>Variables. To change the Member Menu placement, choose bottom (default), top or static.
- "bottom" places the Member Menu in a fixed position at the bottom of the browser window.
- "top" places the Member Menu in a fixed position at the top of the browser window.
- "static" places the Member Menu at the top of the browser window where it will scroll with the rest of the page.
The Member Menu controls are found at Admin>Builders>Member Menu and work much the same as the Navigation Menu, you can follow those same instructions for changing icons, text, naming and ordering.
On the right hand side of the Member Menu Builder box, you'll see two options: Top and Top Extra. These are misleading designations as neither are on "top."
- "Top" refers the items on the right hand side of your toolbar
- "Top Extra" refers to the items on the left hand side of your toolbar
Pages and Page Blocks
To create custom pages using Dolphin Page Builder: http://www.boonex.com/trac/dolphin/wiki/TutorialHowToCreatePagesWithDolphinPageBuilder and http://www.boonex.com/trac/dolphin/wiki/TutorialDolphinPageBuilderAdditionalTips
The links above will also show you how to create and format the Page Blocks that make up your pages in Dolphin. For more advanced Page Block formatting, you can also get Deano's Tools http://www.boonex.com/m/Deanos_Tools_V1_6_Dolphin_7_0_Version, a free module that allows you additional functionality on your admin panel including inserting, editing and deleting PHP Blocks.
Page Access Control
Much in the same way that the Navigation Menu controls allow you to control what Navigation Menu items are visible to visitors and members, Page Access Controls allows you to control Top Menu, Member Menu and Page Blocks visibility/access by membership levels.
- Page Access
- Here you can view your Current Access Rules and create New Access Rules.
- Top Menu Access & Member Menu Access
- Click on the hyperlinked name of the menu item.
- Select/deselect the membership levels as needed.
- Click "Save Changes."
- Page Blocks Access
- Choose the page you want to control from the drop down menu.
- Click on the hyperlinked name of the Page Block.
- Select/deselect the membership levels as needed.
- Click "Save Changes."
Personalizing Text
Your standard installation of Dolphin comes with much default text which needs to be edited in order to make your site look more professional and personalized. Most of this text is controlled via Language Keys in Admin>Settings>Language Settings>Manage Keys. Remember to save text files on your local computer of any updates you make to these files as they are likely to be overwritten during Dolphin upgrades, this way you'll be able to quickly re-personalize the text on your site without too much hassle.
Here are just a few of the spots that need to be edited for your site. You may find that you want to edit other areas as well.
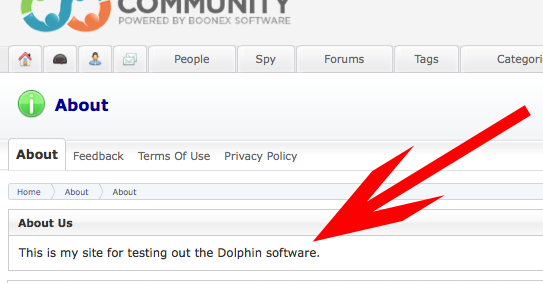
- About Us page.
- This is probably the most important edit, since the default About Us page is about Dolphin software!
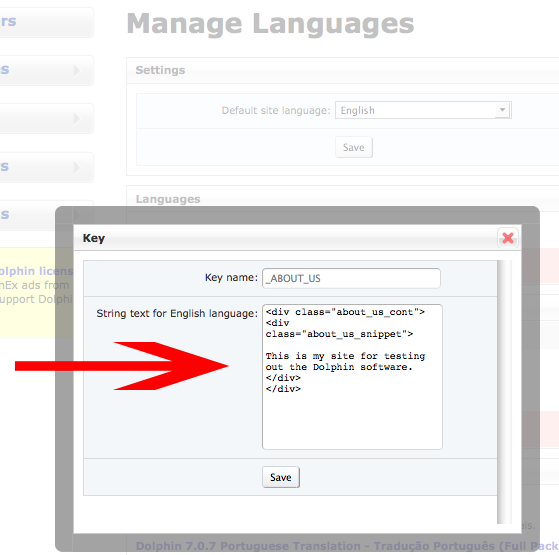
- Admin>Settings>Language Settings>Manage Languages, search for: _ABOUT_US.
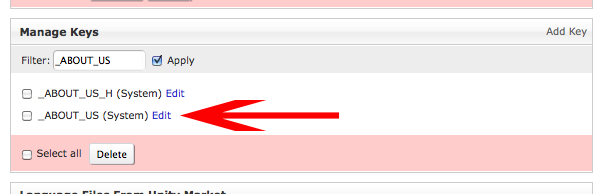
- The key for the body text is _ABOUT_US (System).
- Click the "Edit" hyperlink to get to the pop up edit box. You may use basic html coding to edit the text to your liking.
- Privacy Policy page.
- You'll want to, at the very least, edit the parts of the Privacy Policy that are about Dolphin software and make it more personalized to your site!
- Admin>Settings>Language Settings>Manage Languages, search for: _PRIVACY.
- The key for the body text is _PRIVACY (System).
- Click the "Edit" hyperlink to get to the pop up edit box. You may use basic html coding to edit the text to your liking.
- Terms of Use page.
- You'll want to, at the very least, edit the parts of the Terms of Use that are about Dolphin software and make it more personalized to your site! You should also make sure that the Terms listed are applicable for your site, you may need to remove some items and add others.
- Admin>Settings>Language Settings>Manage Languages, search for: _TERMS_OF_USE.
- The key for the body text is _TERMS_OF_USE (System).
- Click the "Edit" hyperlink to get to the pop up edit box. You may use basic html coding to edit the text to your liking.
- FAQ (Frequently Asked Questions) page.
- You'll want to definitely change the FAQ since they are all about Dolphin software and you'll want your site's FAQ to be more personalized to your site! You'll likely discover more FAQs as you are actually asked questions about your site, but in general you'll want to answer the following: "How do I register?," "Is the site free?," and "How do I contact the Administration?." You'll also want to include information about how to use some of the features on your site.
- Admin>Settings>Language Settings>Manage Languages, search for: _FAQ_INFO.
- The key for the body text is _FAQ_INFO (System).
- Click the "Edit" hyperlink to get to the pop up edit box. You may use basic html coding to edit the text to your liking. You'll want to make note of the coding use for FAQ headers and answers in order to keep the same default formatting.


- Contact us page.
- The default text, "Feedback section - questions, comments, regards," may work for you. However if you want to edit it to make it more in line with your site:
- Admin>Settings>Language Settings>Manage Languages, search for: _CONTACT_H1.
- The key for the body text is _CONTACT_H1 (System).
- Click the "Edit" hyperlink to get to the pop up edit box. You may use basic html coding to edit the text to your liking.
- Subscribe Text (on the homepage for visitors & members by default).
- The default text, "Subscribe now for Your Site Name newsletter to receive news, updates, photos of top rated members, feedback and tips to your e-mail.," may work for you. However if you want to edit it to make it more in line with your site:
- Admin>Settings>Language Settings>Manage Languages, search for: _SUBSCRIBE_TEXT.
- The key for the body text is _SUBSCRIBE_TEXT (System).
- Click the "Edit" hyperlink to get to the pop up edit box. You may use basic html coding to edit the text to your liking. Note that {0} is the coding for the site name.
- Why Join Text (on the homepage for visitors by default).
- The default text, "Join our community now to meet new people; share photos, videos and music; create your own blog; post ads; chat online and more!," may work for you. However if you want to edit it to make it more in line with your site and the features that you offer:
- Admin>Settings>Language Settings>Manage Languages, search for: _login_form_description2join.
- The key for the body text is _login_form_description2join(System).
- Click the "Edit" hyperlink to get to the pop up edit box. You may use basic html coding to edit the text to your liking.
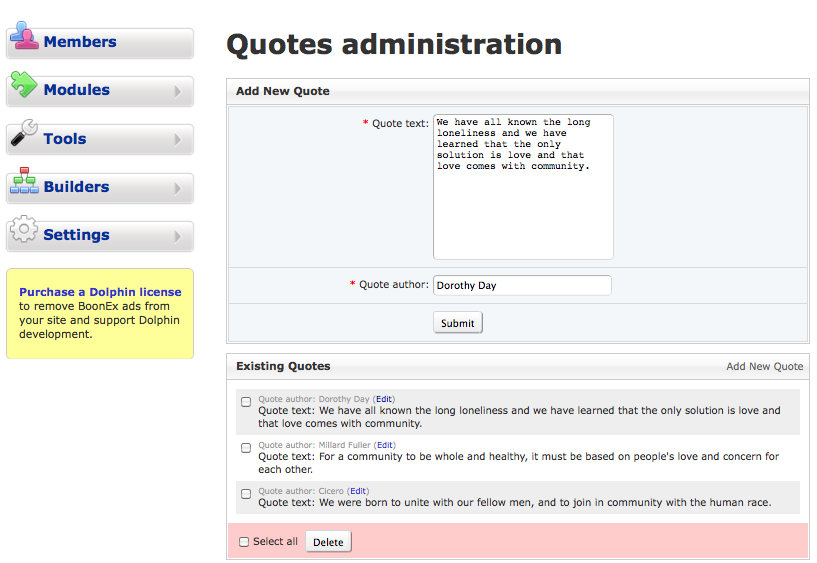
To personalize the Quotations that appear in the upper right hand corner of the site, you can skip the language keys! Go to Admin>Modules>Quotes, where you can Add New Quotes and Edit or Delete existing quotes.

Personalize Email Templates
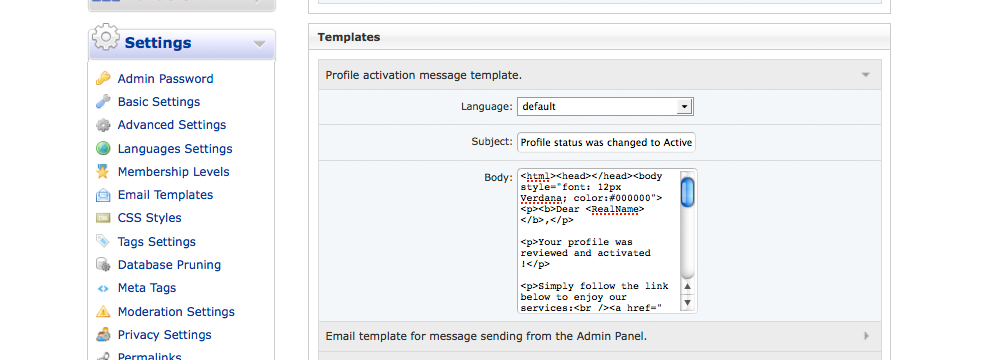
Your default Dolphin installation has Email Templates preformatted for you, however you will definitely want to read through them even though it is a daunting task. You'll want to edit the phrasing so that they are more clear, more professionally worded and in proper English. Remember that your Email Templates are how your site directly communicates with your subscribers & members, you want them to represent you well. In addition, if you have tweaked any of your modules or how your site and/or modules are used, you'll want to edit the Email Templates so that they reflect these changes.
To edit your Email Templates, go to Admin>Settings>Email Templates. There you will find a long list of every email that the system sends out. To access individual templates, click the arrow on the right hand side of the bar next to the one you want to read or edit. There you will find language choices (it will only show the languages you have installed, the default is English only), The Subject of the email and the Body of the email. Edit the Subject and Body to your liking, keeping in mind that some of the emails are sent to onsite email boxes as well as offsite email and that more complex html coding is likely to fail in onsite email boxes.

Remove the Boonex Licensing
- Having Boonex's Licensing on your site makes it look amateurish, you'll definitely want to remove it if you are running a professional site. If your site is a hobby site, this may not be an issue for you. In order to remove the Boonex Licensing on your site, you'll have to purchase a Permanent, Prime or Enterprise License http://www.boonex.com/paymentprovider/payment.
- Once you've paid for your License, you will go to Admin>License and enter your license number and click "Register". All Boonex logo & licensing should automatically be removed.
- To remove the BoonEx News Feed on your homepage: Admin>Builders>Page Builder>Homepage. You'll see an Active Block named "BoonEx News," click the grey grabber on the end of the item and drag it down to Inactive Blocks.
- To remove the BoonEx Feeds from your Admin pages: Admin>Settings>Advanced Settings>General and deselect the boxes next to the following two options: "Enable BoonEx News In Admin" and "Enable BoonEx Market Feeds In Admin".
Enjoy your site!
Attachments (13)
- Logo-odd-size.png (120.9 KB) - added by ggsinc 14 years ago.
- Logo-odd-size-in-action.png (330.9 KB) - added by ggsinc 14 years ago.
- Browser-Name.png (126.7 KB) - added by ggsinc 14 years ago.
- Browser-Name-in-action.png (293.1 KB) - added by ggsinc 14 years ago.
- Copyright.png (61.0 KB) - added by ggsinc 14 years ago.
- nav-menu-lang-key.png (51.1 KB) - added by ggsinc 14 years ago.
- nav-menu-lang-settings.png (34.9 KB) - added by ggsinc 14 years ago.
- nav-menu-icon.png (61.9 KB) - added by ggsinc 14 years ago.
- Language-key-edit.png (44.1 KB) - added by ggsinc 14 years ago.
- Language-key-in-action.png (41.0 KB) - added by ggsinc 14 years ago.
- Language-key-search.png (20.5 KB) - added by ggsinc 14 years ago.
- Quotations.png (83.5 KB) - added by ggsinc 14 years ago.
- Email-Templates.png (150.9 KB) - added by ggsinc 14 years ago.
Download all attachments as: .zip
